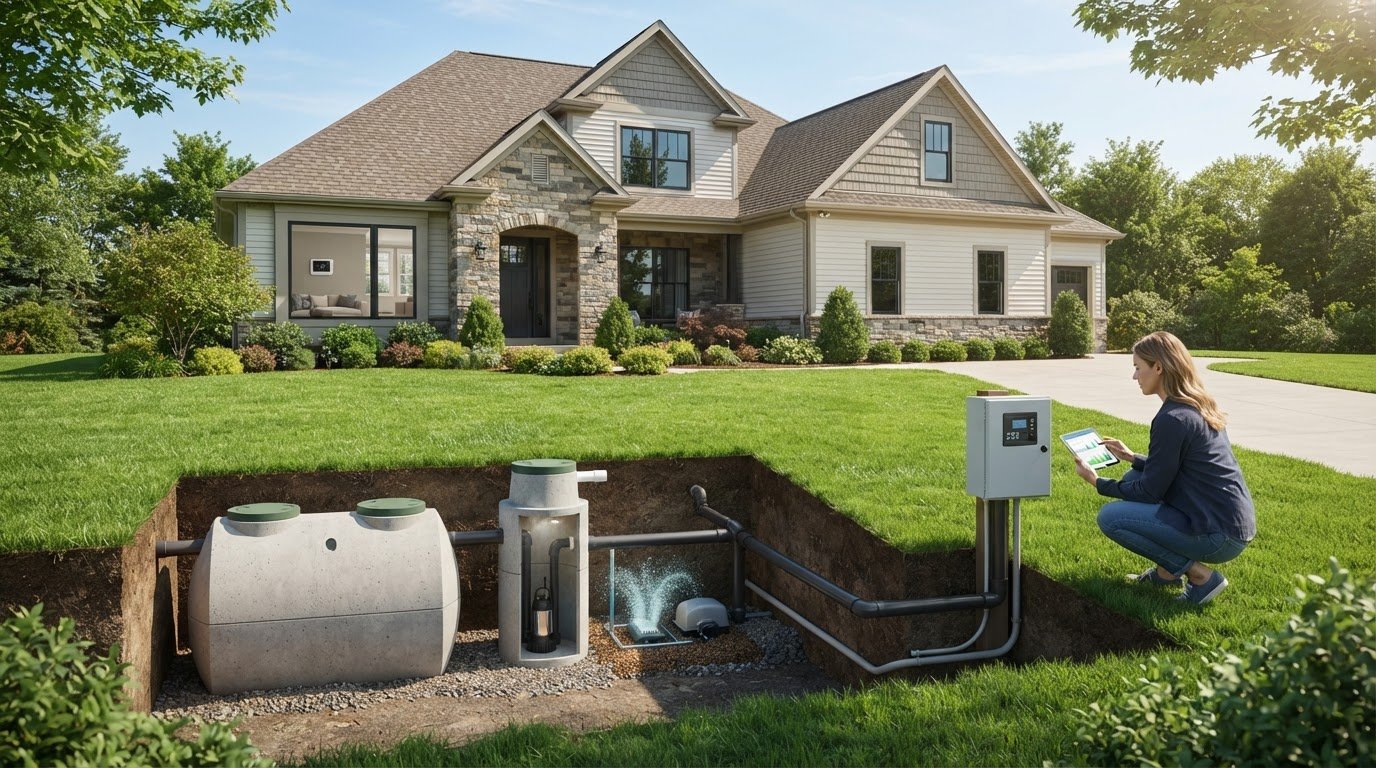
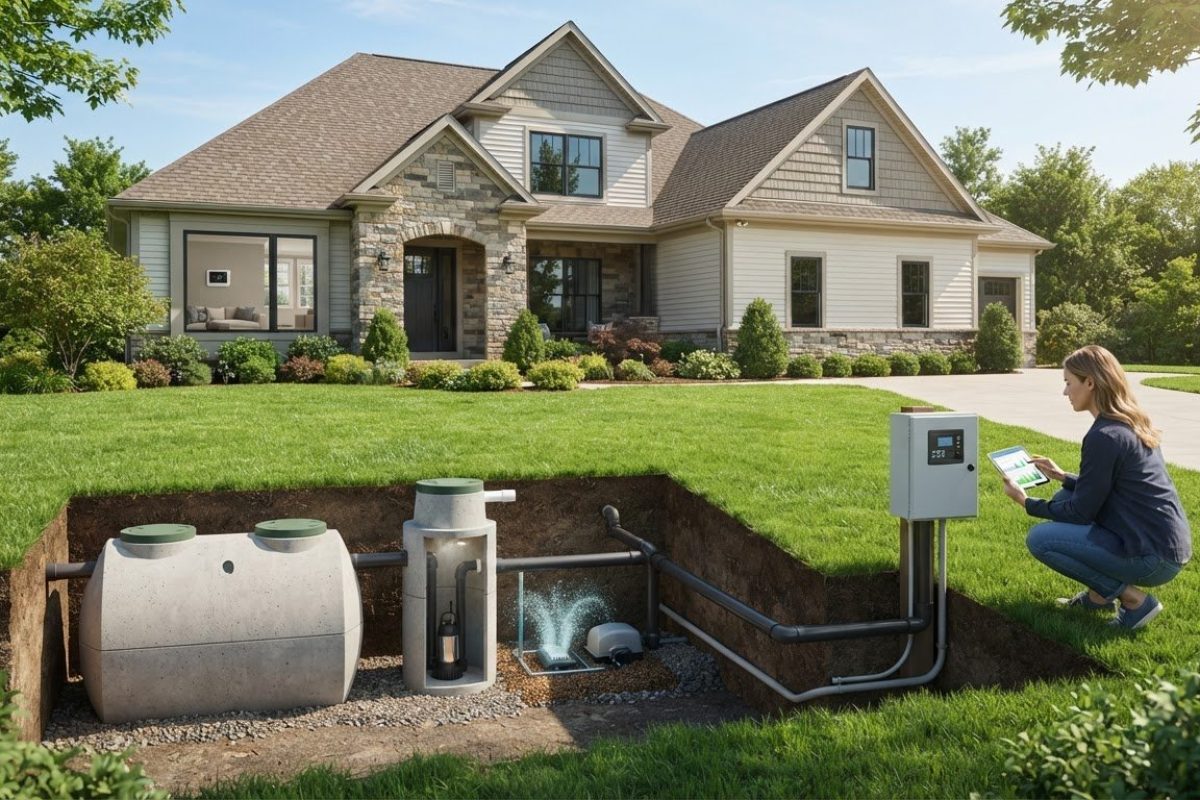
Eco-Nest is a residential wastewater treatment system, not a home thermostat, so it has no household Eco mode to activate. If you want to lower utility bills, treat thermostat settings and septic equipment as separate considerations.
Homeowners have reported utility-bill savings after energy-efficiency upgrades, but those reports don’t show savings from Eco-Nest. Septic treatment and household energy use are different concerns.
This article explains how to assess an Eco-Nest system for residential use, including its suitability, installation considerations, operating costs, and maintenance. Use these factors to decide whether the system fits your home and existing septic setup.
Key Takeaways
- Learn how to activate Eco mode manually and when the regular temperature schedule resumes.
- See how household upgrades and energy habits can shape utility-bill savings, beyond the thermostat setting alone.
- Understand which home and site details matter when assessing a residential system and its ongoing costs.
- Review the installation, local approval, and maintenance questions to consider before choosing a system.
- Explore how Aero-Stream’s Eco-Nest™ NSF/ANSI 40 Systems and related septic products may fit your needs.
How much does an Eco-Nest system cost, including installation and ongoing expenses?
- Separate equipment costs from the full project budget. List the system, site preparation, installation labor, electrical work, and any required local approvals as distinct items. The total depends on the system configuration and work your property needs. For example, a site with straightforward access may need less preparation than one with obstacles near the septic tank. Comparing an itemized estimate with your project scope shows what each charge covers.
- Define the installation scope before comparing estimates. Record whether the project involves a new system, an upgrade, or changes to existing septic equipment. Note tank access, available power, and site conditions that could affect labor. These details help explain differences between installation estimates. Keep equipment costs separate from labor and site work to see which parts drive the total.
- Estimate operating costs from the air blower’s electrical demand and your utility rate. Find the equipment’s rated power and expected operating pattern in its technical documentation, then compare those details with your household electricity charges. A system that runs more often uses more electricity than one with less operating time. Avoid assuming the blower’s expense is negligible or that it will match another home’s bill. Household usage, utility rates, and equipment operation all shape the ongoing total.
- Include routine care and possible replacement parts in your ownership plan. Check the system’s instructions for inspections, cleaning, and component checks. The air blower continuously adds air to wastewater to support aerobic treatment, so its operation and condition matter. Track maintenance dates, unusual sounds, and changes in performance. These records can help you identify emerging problems and distinguish routine care from repairs.
- Judge savings against the costs the system is intended to address, not against unrelated household upgrades. Septic treatment performance and household energy use are different measures. A lower electricity bill after installing efficient lighting, for example, does not establish savings from wastewater equipment. Compare your project’s purchase, installation, operating, and maintenance costs over the same period. For a residential system, the NSF/ANSI 40 designation identifies the relevant system category, while site scope and operating costs still shape your budget.
What home size, climate, and site conditions are suitable for Eco-Nest?
- Start with wastewater demand, not square footage alone. List the home’s regular occupants, bedrooms, and water-using appliances. A compact house with frequent guests may produce more wastewater than its floor area suggests, while a larger home with fewer residents may have a different daily flow pattern. Match the system’s rated treatment capacity to household use, allowing for changes such as added bedrooms or residents. For an Eco-Nest system for residential use, design flow is a more useful starting point than home size alone.
- Compare household flow with the system’s design rating. Laundry loads, long showers, and simultaneous appliance use can create peak flows. Several laundry loads in one day, for example, can send wastewater through the treatment process faster than steady, spread-out use. Account for routine peaks, not only an average day. Keep a simple record of household water-use patterns before selecting a system.
- Assess seasonal occupancy before deciding what fits. A year-round home has a different use pattern from a cabin occupied mainly in summer. Long gaps between visits, seasonal shutdowns, or sudden high occupancy can affect treatment conditions. Record when the home is occupied and how water use changes through the year. Check the system’s operating guidance for your occupancy pattern, including startup after an extended period with little wastewater.
- Review climate exposure around the equipment and wastewater lines. Freezing conditions can affect exposed components and shallow pipes, while heavy rain can saturate surrounding soil. Identify where snowmelt or stormwater collects near the treatment area, and direct roof drainage and surface runoff away from septic components. A shaded, wet area can behave differently from a sunny, well-drained part of the same property.
- Map the proposed location against soil, slope, and groundwater conditions. A steep slope can complicate wastewater movement, while slowly draining soil can limit effluent dispersal. Seasonal high groundwater also matters because the treatment area needs suitable separation from saturated conditions. Record visible wet spots, erosion, and nearby wells. A soil evaluation and site layout help establish whether the property can support the required treatment and dispersal arrangement.
- Check access to the septic tank, electrical service, and components that need maintenance. The location should allow routine inspection without placing equipment under a driveway, deck, or future addition. A system beside a planned garage, for example, could become difficult to reach later. Mark utility routes and planned landscaping before finalizing the layout. Protect access points from vehicles, heavy storage, and changes to the grade.
- Use design documents alongside actual property conditions. Create a site summary covering occupancy, seasonal use, soil observations, drainage, slope, and access. If the home has high peak water use and a constrained drainfield, address both before planning installation. An Eco-Nest system for residential use must suit the combined wastewater flow, treatment capacity, climate exposure, and dispersal area, not just the building’s dimensions.
Homeowner testimonial: $150 per winter month saved after insulating a 60-year-old home’s walls and floors, supported by Aero-Stream technology.
What permits, building codes, and utility rules apply to installing Eco-Nest in the United States?
- Start with the property address and identify the public offices that review onsite wastewater work. Record the county or city, parcel number, and existing septic-system details. Use this information to ask about permit applications, plan documents, reviews, and inspections for your project. Requirements can depend on location and project scope, so a checklist from another property may not apply. Keep the answers with your project records.
- Describe the work precisely before asking about approvals. State whether the project is a new system, a replacement, or a modification to existing treatment equipment. Include a simple site sketch showing the septic tank, treatment equipment, drainfield, house, and property boundaries. A change to equipment, for example, may raise different review questions from a new drainfield layout. Clear descriptions help the reviewing office identify applicable requirements.
- Ask which documents the reviewing office expects for your project. Prepare equipment specifications, a site plan, system layout, and any available septic records. If an application requests soil or site information, organize those materials with the plan rather than sending disconnected documents. Keep dated copies of submissions and responses. A complete project file makes it easier to answer requests for clarification.
- Separate wastewater approvals from building and electrical questions. Ask the relevant local offices whether the proposed work affects building plans, electrical connections, or other property approvals. An air blower needs power, but that alone does not establish which electrical review applies. Record the equipment location, power source, and connection plan. Describe any changes to nearby structures or wiring clearly.
- Review utility conditions before work begins. Identify the electric utility serving the property and note the planned equipment load from its documentation. Ask whether the connection arrangement, meter, or service capacity requires utility coordination. Don’t assume a utility rebate, special rate, or approval applies simply because the equipment uses electricity. Keep utility guidance separate from local wastewater and building review documents.
- Request a written sequence for reviews, site visits, and closeout records. Confirm which office receives each document and how it communicates approval status. A project log can track an application, requested revisions, and final inspection records without assuming every project follows the same steps. Save approved plans and equipment documents together. This file can support future service, property records, and questions about system changes.
- Before scheduling work, compare the approved scope with the planned installation. Check that the equipment location, electrical details, and wastewater layout match the submitted documents. If a site change becomes necessary, document it and ask the reviewing office how it affects the approval record. This helps prevent confusion between the approved plan and the work completed at the property.
Utility-bill examples should be treated as testimonials, not estimates for this project. A Seattle, Washington homeowner testimonial reports saving $60 per month on utility bills after upgrading appliances and lighting to ENERGY STAR models. A Portland, Oregon homeowner testimonial reports that energy-efficiency upgrades lowered monthly utility bills by $100.

How is an Eco-Nest system installed, and how long does installation take
- Begin by matching the equipment plan to the existing septic layout. Locate the septic tank, outlet, drainfield, and proposed aeration chamber. Record access points, electrical supply, and obstacles around the work area. Compare these details with the system’s installation instructions before moving equipment. A clear layout helps prevent misplaced connections and avoidable changes during the work.
- Prepare the work area using the approved site plan and equipment documentation. Keep vehicle traffic, stored materials, and excavated soil away from the drainfield. Protect tank openings and nearby utilities while the area is accessible. If an obstruction requires a layout change, resolve it before proceeding. The system’s position affects access, air equipment placement, and future service.
- Position the treatment components according to the manufacturer’s instructions. The tank and treatment chamber need the specified connections for wastewater flow and aeration. Don’t improvise fittings or alter the equipment arrangement. An air line routed through an unsuitable path, for example, can complicate inspection and maintenance. Check each component’s orientation before making permanent connections.
- Connect the air blower and check its power arrangement against the product documentation. The blower adds oxygen to wastewater, supporting aerobic treatment. Secure air lines so they remain accessible and protected from damage. Before startup, inspect connections for kinks, loose fittings, or obstructions. Proper airflow matters because the treatment process depends on oxygen reaching the wastewater.
- Review wastewater connections before covering or closing access points. Confirm that the inlet, outlet, and any required filters align with the system layout. Keep the effluent filter accessible for inspection. Errors are easier to address before soil or landscaping covers the work. Keep photographs and product documents with the property’s septic records.
- Start the equipment according to its operating instructions, then confirm normal operation. Listen for the air blower, inspect accessible connections, and check that indicators behave as described in the documentation. Record the startup date and initial observations. Have the person responsible for the work explain routine operating checks, alarm responses, and which records to retain.
- Plan the schedule around site conditions, not a guessed installation duration. Preparation, access, weather, excavation needs, electrical work, and inspection timing can all affect the timeline. A straightforward equipment change may involve less site work than a project requiring substantial layout changes. Separate preparation and review time from physical installation, then confirm the sequence against the actual project scope.
What maintenance does Eco-Nest require, and what is its expected lifespan
- Keep the system’s manuals, startup notes, and service records together. Record the equipment model, installation date, and each inspection or repair. These details help distinguish normal wear from changes in treatment performance. If a component is replaced, add its model and service date. A complete record helps you plan future care and compare equipment condition over time.
- Check the air blower during routine visual inspections. Look for unusual noise, vibration, blocked vents, damaged wiring, or loose air lines. The blower supplies oxygen that supports aerobic treatment, so changes in airflow deserve attention. Don’t open electrical housings or reach into wastewater equipment. Note any changes and follow the equipment manual’s troubleshooting instructions before deciding whether service is needed.
- Inspect accessible covers and risers for damage, shifting, or water entry. Keep lids secured and access clear for inspection. Never enter a septic tank or aeration chamber, as wastewater spaces can present serious hazards. If a cover is cracked or displaced, keep people away and arrange appropriate repair. Record its location and condition so later inspections can identify changes.
- Watch for operating changes around the home and drainfield. Slow drains, persistent odors, wet ground, or unusual system alarms can signal a problem that needs prompt attention. Note when symptoms began and whether heavy water use came beforehand. Several laundry loads in one day, for example, may coincide with a temporary change in household wastewater flow. Avoid repeatedly resetting alarms without identifying their cause.
- Protect treatment performance through everyday water-use habits. Repair leaking fixtures, spread laundry across different days, and avoid sending grease or harsh chemicals into the drain. Sudden surges can disrupt the wastewater flow, while unsuitable substances can interfere with biological treatment. Keep roof runoff and surface water away from the drainfield. These practical steps reduce avoidable strain on the system and its treatment process.
- Follow the manufacturer’s maintenance schedule for filters, electrical parts, and other serviceable components. Don’t substitute a guessed interval for the instructions for your equipment. Record each task, its findings, and any replaced parts. Component lifespan depends on design, operating conditions, and upkeep, so use the manufacturer’s guidance for each part rather than assuming one lifespan applies to the whole system.
- Review your records at each service visit and compare current performance with earlier observations. Ask the technician to document blower operation, accessible connections, alarms, and any changes to treatment conditions. If an issue returns after a repair, provide those dated notes. To organize care, get guidance on septic system maintenance and keep the system’s own instructions as your primary reference.
Aero-Stream: Eco-Nest™ NSF/ANSI 40 Systems
Aero-Stream offers Eco-Nest™ NSF/ANSI 40 Systems for homeowners assessing residential wastewater treatment options. If your review of site conditions, system operation, or maintenance points to a need for a treatment system, consider how an Eco-Nest system fits your property and household use. Its NSF/ANSI 40 designation can help you identify the system category as you compare project requirements and documentation.
Aerobic treatment relies on oxygen to support aerobic bacteria. Choose a system that aligns with your existing septic layout, wastewater flow, and applicable project approvals. Review system documentation alongside your property’s needs. For existing septic concerns, Aero-Stream offers Residential Remediator® Kits, Bio-Brush® technology, and septic tank air pumps.
Contact Aero-Stream to discuss Eco-Nest™ NSF/ANSI 40 Systems for your residential project.
Make your next septic decision with a clear plan
Aero-Stream’s Eco-Nest is a septic treatment system, not a thermostat, so it has no thermostat Eco mode. If you mean a Nest thermostat, select Eco mode using the thermostat or its app. When you next change the temperature setting, the regular schedule resumes. Check the thermostat display to confirm Eco mode is active.
Keep thermostat settings and septic treatment decisions separate. To track utility savings, note your bill before changing the thermostat setting, then compare it with later bills while accounting for other household changes. This gives you a clearer view of the effect of your temperature settings.
For questions about septic treatment options, contact Aero-Stream for help. Make each decision based on the system you’re adjusting, and you’ll have a clearer path forward.
Frequently Asked Questions
What is the Eco-Nest system and how does it work in a residential home?
Eco-Nest is a residential wastewater treatment system that adds oxygen to support aerobic treatment. It has no household thermostat Eco mode. The treatment equipment and home temperature controls serve different purposes: Eco-Nest treats septic wastewater, while a thermostat setting changes how a home manages heating or cooling. Keep those controls and expected outcomes separate when planning household improvements.
What residential Eco-Nest system products and configurations are available?
Available configurations include the AS500-1 single-chamber Class II model and double- or triple-chamber Class I models. Listed flow ratings are 450, 500, 600, 750, 1,000, and 1,500 gallons per day. Use the system’s rated flow and the property’s wastewater design requirements when comparing configurations. For example, a home’s bedroom count alone doesn’t establish its wastewater treatment needs; the system design and expected flow also matter.
How much energy, water, or money can a residential Eco-Nest system save?
Eco-Nest is wastewater treatment equipment, not a household energy- or water-saving control. Its listed power draw is 110 to 190 watts, so electricity use and cost depend on operating time and your utility rate. It doesn’t inherently reduce household water consumption. To assess savings, track septic-system operating costs separately from utility changes tied to measures such as thermostat adjustments or efficient lighting.